
Getting started
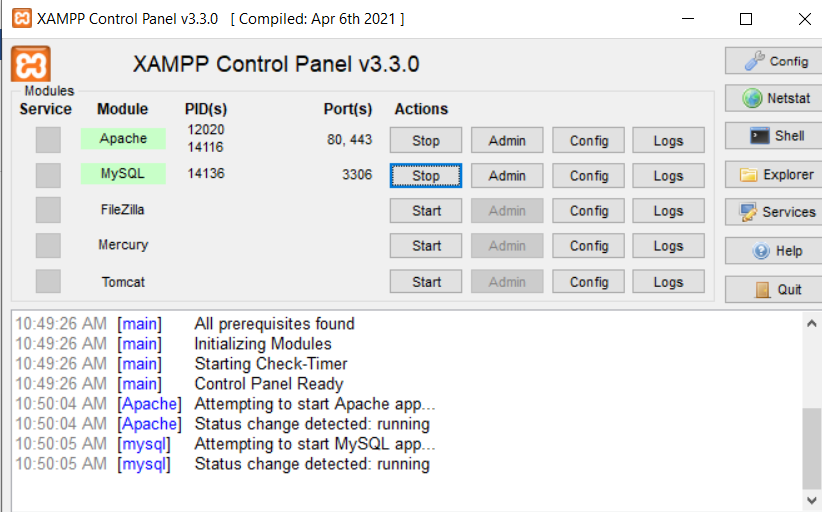
Welcome, PHP beginners! Before diving into the content, make sure you have your development environment set up. If you’re using XAMPP, ensure that both MySQL and Apache are up and running, as illustrated in the figure below.
For an alternative, you can also use Laragon instead of XAMPP. Laragon is a lightweight, portable, and easy-to-use development environment that simplifies PHP development.
If you find the basics a bit challenging, consider checking out other blog links for a more in-depth understanding.
Note: Please be aware of the limitations of this system. Always refer to the last section of the webpage for important information and potential constraints.
XAMPP Setup
If you are willing to use Laragon or anyother server please skip this step.
Once you’ve initiated MySQL and Apache, create a directory inside XAMPP’s htdocs. Feel free to choose any name for this new folder; for instance, I’ve named it “login,” but you can opt for a different name of your choice.
Within the newly created folder, generate a PHP file named index.php. Insert the following code into the index.php file: <?php echo “Hello, world!”; ?>.
Execute the index.php file by entering localhost/login/index.php into the address bar of your preferred browser. In this tutorial, Chrome is used, as depicted in the figure below.
Laragon Setup
- Create a Project:
- Open Laragon and click on the “www” menu.
- Choose “Quick create” and give your project a name. Let’s use “login” for consistency.
- Create a PHP File:
- Inside the newly created project folder (e.g.,
C:\laragon\www\login), make a PHP file named index.php. - Add the following code to index.php:
<?php echo "Hello, world!"; ?>.
- Inside the newly created project folder (e.g.,
- Run the PHP File:
- Open your preferred browser and enter
localhost/login/index.phpin the address bar. - Ensure Laragon’s Apache server is running.
- Open your preferred browser and enter
This tutorial use Chrome for illustration, as indicated in the figure below.
Note: Whether using XAMPP or Laragon, make sure your chosen server (Apache) is active before attempting to run your PHP files. Explore both environments to determine which one aligns better with your preferences and project requirements.
You can save this code in a file with a .php extension (e.g., index.php) and then run it through your web server (like Apache in XAMPP or Laragon).
<?php
echo "Hello, world!";
?>
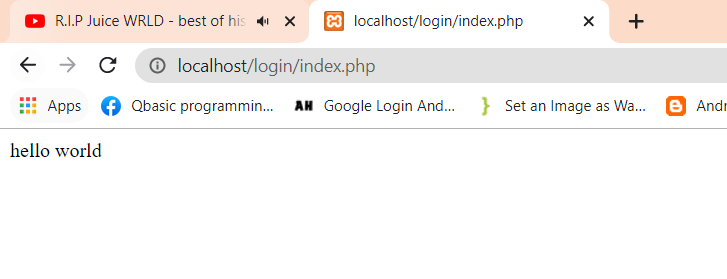
If the “hello world” is seen on screen just like the above picture, the PHP file is running successfully. Now, you can add HTML codes to a PHP file.
Php Files
For registration, we need four PHP files.
- login.php
login.php is for the login page which page checks whether the username and password are correct or not.
2. Register.php
Another page is register.php is for the register to add new users to the systems.
3. Dashboard.php
The dashboard is the page where the logged-in users will be sent.
4. Logout.php
Logout is the page where logged-in users can log out.
If you’re using XAMPP, create the mentioned four PHP files inside the htdocs directory. For Laragon users, open File Explorer and locate the Laragon installation directory, usually resembling something like C:\laragon\www.
Database
Connecting to MYSQL DATABASE
In our PHP script, we kick off by initiating a session with session_start(). This enables us to manage session variables, facilitating the storage and retrieval of user-specific data as they navigate through various pages of our website.
Moving on to the database connection, we collectively define the essential parameters for our MySQL database – the host (dbhost), user (dbuser), password (dbpass), and database name (dbname).
With these details in place, we try to establish a connection to the MySQL database using PHP Data Objects (PDO). This powerful tool not only streamlines the process but also provides a secure and efficient means of interaction.
<?php
session_start();

// Define localhost, databaseuser, database user and database name
define('dbhost', 'localhost');
define('dbuser', 'root');
define('dbpass', '');
define('dbname', 'test');

// Connecting to above mentioned database
try {
    $conn = new PDO("mysql:host=".dbhost."; dbname=".dbname, dbuser, dbpass);
    $conn->setAttribute(PDO::ATTR_ERRMODE, PDO::ERRMODE_EXCEPTION);
}
//if any error occured
catch(PDOException $e) {
    echo $e->getMessage();
}

?>
In the event of a connection failure, we catch the exception and display an error message, allowing us to promptly address and resolve any potential concerns in our collaborative development efforts. You can now put this code in every PHP file.
The default database hostname is the localhost. if you haven’t set the username and password for your database, please write root as username and leave blank for the password. If you have set up the username and password for the database, please do write the username and password that you have given.
For database name, you must have to make the database. You can give any name to the database, in my case, I am giving a test as a database name.
Since we are using the PHP data object, we have to create new PDO object by using the new keyword. $conn is the connection variable name.
For error handling, we must have to enclose the connection statement with try and catch block. If an error occurred inside the connection code, the error is handled by the catch block.
Creating database
Now, let’s proceed to create a database named ‘test.’ There are four approaches to achieve this: utilizing a Graphical User Interface (GUI), crafting SQL queries manually, using php code to create database(Sql queries inside php) or importing SQL files into your localhost.
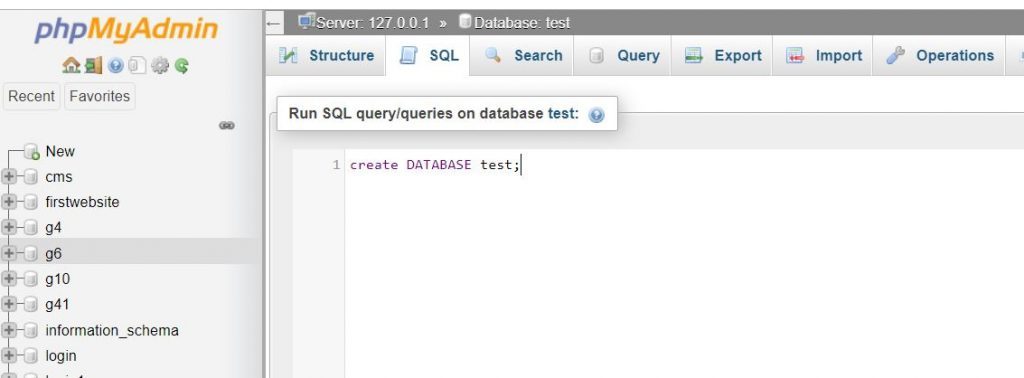
For the purpose of this article, we’ll focus on the SQL queries required to establish the database for registration. Our initial step involves creating both the database and a corresponding table. Execute the following query to create the database, and input this query within the SQL tab, as illustrated in the figure below:
CREATE DATABASE IF NOT EXISTS test;This query ensures the creation of the ‘test’ database, and the “IF NOT EXISTS” clause prevents accidental overwrites if the database already exists.
Creating Table
After creating a database, use the database you have created and run the following query to make a table.
CREATE TABLE
login
(

id
 int(10) NOT NULL,

fullname
 varchar(20) CHARACTER SET utf8 COLLATE utf8_unicode_ci NOT NULL,

username
 varchar(20) NOT NULL,

password
 varchar(20) NOT NULL,

email
varchar(20) NOT NULL
 )
Here we have created the table named login and given the columns with proper constraints. Now to uniquely identify the row of the table, we have to give a primary key to id. You can give the primary key as :
ALTER TABLE
login

   ADD PRIMARY KEY (
id
);
Or alternatively, we can set the primary key while creating a table.
CREATE TABLE
login
(

id
 int(10) NOT NULL AUTO_INCREMENT PRIMARY KEY,

fullname
 varchar(20) CHARACTER SET utf8 COLLATE utf8_unicode_ci NOT NULL,

username
 varchar(20) NOT NULL,

password
 varchar(20) NOT NULL,

email
varchar(20) NOT NULL
 )
Pages
Login page
Inside the login.php file, make a form that takes username and password just like this. Use the following code as a template:
<html>
<head><title>Login</title></head>
<body>
    <h1>Login</h1>
    <form action="" method="post">
    <input type="text" name="username" value="" autocomplete="off"><br ><br>
   <input type="password" name="password" value="" autocomplete="off"><br><br >
     <input type="submit" name='loginbtn' value="Login" class='submit'><br >
             </form>

</body>
</html>
This code creates a basic HTML form for user login, including input fields for the username and password, and a submit button labeled “Login.”
Register page
Just like the login.php page that we have created before, make another page for the registration page. You can give any name to the file.
Inside php file, make similar form as above and add <input> tag for the input just like below.
<html>
<head>
<title>Login</title>
</head>
<body>
    <h1>Login</h1>
    <form action="" method="post">
    <input type="text" name="fullname" value="" placeholder="Fullname"><br><br>
    <input type="text" name="username" value="" autocomplete="off"><br ><br>
    <input type="password" name="password" value="" autocomplete="off"><br><br >
    <input type="text" name="email" value="" autocomplete="off"><br><br >
     <input type="submit" name='regsiterbtn' value="Login" class='submit'><br >
             </form>

</body>
</html>
We have not added any PHP code till now. So we now add PHP code to our register.php file.
To connect to the MySQL database, you can use the same code which was mentioned above and after that, we have to write the PHP logic. In order to register a new user, we must have to take the value from the form and store that data in to the database once the button is clicked.
To get the data from the form we can use $_POST. Before that, we must check whether the button is clicked or not. For that, we can also use $_POST just like the below code.
<?php
session_start();

// Define localhost, database user, database password, and database name
define('dbhost', 'localhost');
define('dbuser', 'root');
define('dbpass', '');
define('dbname', 'test');

// Connecting to the above-mentioned database
try {
    $conn = new PDO("mysql:host=".dbhost."; dbname=".dbname, dbuser, dbpass);
    $conn->setAttribute(PDO::ATTR_ERRMODE, PDO::ERRMODE_EXCEPTION);
}
// If any errors occurred
catch(PDOException $e) {
    echo $e->getMessage();
}

// Check whether the registration button is clicked
if(isset($_POST['registerbtn'])) {

    // Getting data from the form using the following names
    // Ensure the names in the form match the names in $_POST
    $fullname = $_POST['fullname'];
    $username = $_POST['username'];
    $password = $_POST['password'];
    $email = $_POST['email'];

    // Further logic for user registration can be implemented here

    // Example: Inserting data into a users table
    $query = "INSERT INTO users (fullname, username, password, email) VALUES (:fullname, :username, :password, :email)";
    $stmt = $conn->prepare($query);

    // Bind parameters
    $stmt->bindParam(':fullname', $fullname);
    $stmt->bindParam(':username', $username);
    $stmt->bindParam(':password', $password);
    $stmt->bindParam(':email', $email);

    // Execute the query
    $stmt->execute();

    // Additional logic or redirection can be added based on the registration process
}
?>
First, we connected our PHP file with the MySQL database and we got the data from the form when the button is clicked. Now, we have to send the data to the database to store data.
Now, to submit the data to the database, we have to write the SQL query to the PHP file. For that, we can use the $conn->prepare() method and execute that code using execute method. Inside which we will write the SQL code just like this.
$statement = $conn->prepare('INSERT INTO login (fullname, username, password, email) VALUES (?, ?, ?, ?)');
$statement->execute(array( $fullname, $username, $password, $email ));
To catch errors we can enclose the above tag inside the try and catch block. If the SQL query runs successfully, we can redirect the user to the index.php file with the help of header(‘Location: index.php’); code just like the below code
try {
                $statement = $conn->prepare('INSERT INTO login (fullname, username, password, email) VALUES (?, ?, ?, ?)');
                $statement->execute(array( $fullname, $username, $password, $email
                    ));
                header('Location: index.php');
                exit;
            }
            catch(PDOException $e) {
                echo $e->getMessage();
            }
        }
Congratulations, we have successfully completed the register page. In case, you get confused the final register.php file looks like this.
<?php
session_start();

// Define localhost, databaseuser, database user and database name
define('dbhost', 'localhost');
define('dbuser', 'root');
define('dbpass', '');
define('dbname', 'test');

// Connecting to above mentioned database
try {
    $conn = new PDO("mysql:host=".dbhost."; dbname=".dbname, dbuser, dbpass);
    $conn->setAttribute(PDO::ATTR_ERRMODE, PDO::ERRMODE_EXCEPTION);
}
//if any error occured
catch(PDOException $e) {
    echo $e->getMessage();
}


//to check whether the button is clicked or not
    if(isset($_POST['registerbtn'])) {


        // Getting data from the form named the following name
//make sure the name in the form matches the name in the $_POST['name']

        $fullname = $_POST['fullname'];
        $username = $_POST['username'];
        $password = $_POST['password'];
        $email = $_POST['email'];
try {
                $statement = $conn->prepare('INSERT INTO login (fullname, username, password, email) VALUES (?, ?, ?, ?)');
                $statement->execute(array( $fullname, $username, $password, $email
                    ));
                header('Location: login.php');
                exit;
            }
            catch(PDOException $e) {
                echo $e->getMessage();
            }
        }
?>
<html>
<head><title>Register</title></head>
<body>
                <form action="" method="post">
                    <input type="text" name="fullname" placeholder="Fullname" value="" autocomplete="off" /><br /><br />
                    <input type="text" name="username" placeholder="Username" value="" autocomplete="off" /><br /><br />
                    <input type="password" name="password" placeholder="Password" value=""/><br/><br />
                    <input type="text" name="email" placeholder="Email" value="" autocomplete="off" /><br /><br />
                    <input type="submit" name='registerbtn' value="Register" class='submit'/><br />
                </form>
</body>
</html>
You can alternatively run SQL code like this:
$statement = $conn->prepare('INSERT INTO login(fullname, username, password, email) VALUES (:fullname, :username, :password, :email)');
$stmt->execute(array(
':fullname' => $fullname,
':username' => $username,
':password' => $password,
':email' => $email
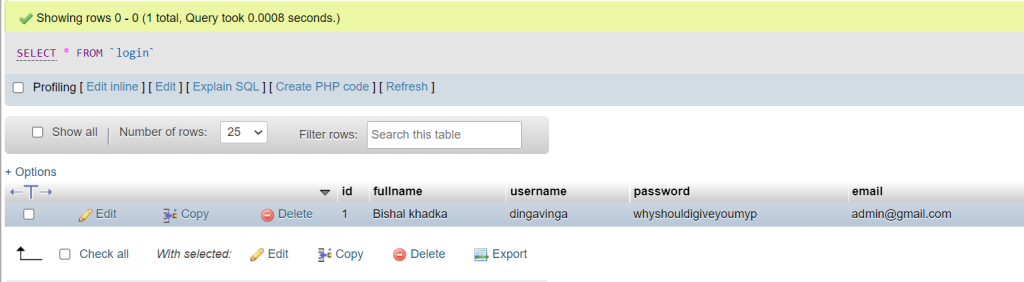
));Now, You can see the data in the database like in the image below.
Login Page
Now for the login page, we have already created the HTML page. If you have forgotten, please scroll above, you will find it. The login.php is similar to regsiter.php, only difference is we have to write SQL query for retrieval of data instead of submitting data to the database.
To retrieve data from the database, we can use SELECT id, fullname, username, password, email FROM login WHERE username = ? and fetch the data using fetch(PDO::FETCH_ASSOC); After retrieving data from the database, we can check whether the password given by the user in the forms is the same which is in a database or not. To check that we can use if condition just like below.
$statement = $connect->prepare('SELECT id, fullname, username, password, email FROM login WHERE username = ?');
                $statement->execute(array($username));
                $data = $statement->fetch(PDO::FETCH_ASSOC);

                    if($password == $data['password']) {
                        header('Location: index.php');
                        exit;
                    }
                    else
                        $error= 'Password  do not match.';
                }
The full code looks like this.
<?php
session_start();

// Define localhost, databaseuser, database user and database name
define('dbhost', 'localhost');
define('dbuser', 'root');
define('dbpass', '');
define('dbname', 'test');

// Connecting to above mentioned database
try {
    $conn = new PDO("mysql:host=".dbhost."; dbname=".dbname, dbuser, dbpass);
    $conn->setAttribute(PDO::ATTR_ERRMODE, PDO::ERRMODE_EXCEPTION);
}
//if any error occured
catch(PDOException $e) {
    echo $e->getMessage();
}
//to check whether the button is clicked or not

    if(isset($_POST['loginbtn'])) {
        $error = '';

        // Getting data from the form named the following name
//make sure the name in the form matches the name in the $_POST['name']
        $username = $_POST['username'];
        $password = $_POST['password'];

            try {
                $statement = $conn->prepare('SELECT id, fullname, username, password, email FROM login WHERE username = ?');
                $statement->execute(array($username));
                $data = $statement->fetch(PDO::FETCH_ASSOC);

                    if($password == $data['password']) {

                        header('Location: dashboard.php');
                        exit;
                    }
                    else
                        $error= 'Password  do not match.';
                }

            catch(PDOException $e) {
                $error = $e->getMessage();
            }
        }


?>

<html>
<head><title>Login</title></head>

<body>

            <?php
                if(isset($error)){
                    echo '<div style="color:red;">'.$error.'</div>';
                }
            ?>
            <h1>Login</h1>

                <form action="" method="post">
                    <input type="text" name="username" value="" autocomplete="off"/><br /><br />
                    <input type="password" name="password" value="" autocomplete="off"/><br/><br />
                    <input type="submit" name='loginbtn' value="Login" class='submit'/><br />
                </form>

</body>
</html>
Now, we can make a dashboard.php file. We can use $_SESSION[‘name’] to get the name of the logged-in user. Inside dashboard.php, we can add a link to logout the page just like this.
Dashboard page
<?php
session_start();

// Define localhost, databaseuser, database user and database name
define('dbhost', 'localhost');
define('dbuser', 'root');
define('dbpass', '');
define('dbname', 'test');

// Connecting to above mentioned database
try {
    $conn = new PDO("mysql:host=".dbhost."; dbname=".dbname, dbuser, dbpass);
    $conn->setAttribute(PDO::ATTR_ERRMODE, PDO::ERRMODE_EXCEPTION);
}
//if any error occured
catch(PDOException $e) {
    echo $e->getMessage();
}
    if(empty($_SESSION['name']))
        header('Location: login.php');
?>

<html>
<head><title>Dashboard</title></head>

<body>
                Welcome <?php echo $_SESSION['name']; ?>  to our web application<br>
                <a href="logout.php">Logout</a>
</body>
</html>
Logout Page
Now we are only left with one task that is logout. To log out from our system, we have to destroy our session with session_destroy(); function and redirect the user to another page. In this example, I will redirect the user to index.php.
<?php
session_start();

// Define localhost, databaseuser, database user and database name
define('dbhost', 'localhost');
define('dbuser', 'root');
define('dbpass', '');
define('dbname', 'test');

// Connecting to above mentioned database
try {
    $conn = new PDO("mysql:host=".dbhost."; dbname=".dbname, dbuser, dbpass);
    $conn->setAttribute(PDO::ATTR_ERRMODE, PDO::ERRMODE_EXCEPTION);
}
//if any error occured
catch(PDOException $e) {
    echo $e->getMessage();
}
    session_destroy();

    header('Location: index.php');
?>
Further works
Limitation of this system:
- This system hasnot handeled any other error like empty input from the user and hasnot checked the format error.
- This system hasnot hashed the password. In real life project, we generally hash the password for the security issue.
- Instead of writing connection code in each file we can write the connection code in one file and inclued that code in each page by using <?php require ‘conection.php’;
- The user interface is not used as we have not used any styling to our website.
- In regsiter.php, we havenot checked whether the username is already present or not. Duplicate username is allowed. This will add user with same username multiple time. Due to this, username with different password doesnot work at all. In login.php also we have not given user clue if they entered wrong password or username.
Code Optimization
You can also use php_include for better code organization. You will have to separate the database connection code into a file named db_connection.php and then include it in the registration logic file.
You can also implement validation and sanitization for user inputs to prevent malicious data. Validate user inputs on the server-side and sanitize them before interacting with the database.
Additionally, we can also use strong password hashing algorithms like password_hash() and password_verify() to store user credentials securely instead of using password without hashing.
We can also Embrace the Separation of Concerns principle, our codebase can be structured to distinctly handle database logic, business logic, and presentation logic. This organizational strategy enhances code readability and maintainability.
Further Enhancement
Password Policy:
We can implement a robust password policy during user registration, incorporating minimum length requirements and a mix of uppercase, lowercase, numbers, and special characters.
Password Recovery:
We can develop a secure password recovery mechanism to enable users to reset forgotten passwords through a well-defined and secure process.
Account Lockout:
We can implement an account lockout mechanism triggered after a certain number of unsuccessful login attempts, preventing brute-force attacks.
Remember Me:
If deemed necessary, We can implement a “Remember Me” feature securely by using long-lived tokens and ensuring their secure storage and validation.
This is for learning purposes only. There may be many errors in this system. So, to cross-check I have uploaded the code to GitHub : https://github.com/dingavinga/Registration-page-in-PHP-using-PDO-PHP-DATA-OBJECT
Thank you for reading this article. Hope you liked this. If you face any confusion, feel free to ask question in our Codynn’s discord server: https://discord.com/invite/V3RmuWa4dS