
In this tutorial, we’ll use the flutter framework to create straightforward mobile api applications. You must be familiar with the flutter widgets before learning this. After this, the dummy data that we had earlier entered will be seen via the api. We will we working with the WordPress rest api in this tutorial.
In this lesson, we’ll be using the WordPress rest api.
In short, we will use the api to display the content of WordPress. We don’t need to bother about api because backend devs create api.
We will be using the api:
www.allbachelor.com/wp-json/wp/v2/posts?categories=11
If you open the above mentioned url link in your browser, a shitload of text will be displayed. You must use an extension to prettify the json in order to view the text in formatted json. You may look up those types of extensions on Google. I’m using the Safari web browser with the pretty json addon.
The API now has a more readable appearance than before. The key and value pair are easily visible here.
Now that we are aware of the data’s source, we must fetch it for our mobile application. To do this, build a new Flutter project and run a Class that implements StatefulWidget inside the main function, as seen in the code below.
import 'package:flutter/material.dart';

void main() {
 runApp(const ApiExample());
}

class ApiExample extends StatefulWidget {
 const ApiExample({Key? key}) : super(key: key);

 @override
 State<ApiExample> createState() => _ApiExampleState();
}

class _ApiExampleState extends State<ApiExample> {
 @override
 Widget build(BuildContext context) {
   return MaterialApp(
     home: Scaffold(
       appBar: AppBar(
         title: const Text('Api Example'),
       ),
       body: const Center(
         child: Text('Hello World'),
       ),
     ),
   );
 }
}
The empty array must be defined inside State Class. I’ve given this array the name “posts,” but you can give it another one. You can also set the loading to true, and once the post has loaded, the isLoading state will be changed to false. An initState method must then be created; this method is only called once, upon the addition of the Stateful Widget to the widget tree.
import 'dart:convert';
import 'package:http/http.dart' as http;
import 'package:flutter/material.dart';

void main() {
 runApp(const ApiExample());
}

class ApiExample extends StatefulWidget {
 const ApiExample({Key? key}) : super(key: key);

 @override
 State<ApiExample> createState() => _ApiExampleState();
}

class _ApiExampleState extends State<ApiExample> {
 List posts = [];
 bool isLoading = true;

 @override
 void initState() {
   super.initState();
    }

 @override
 Widget build(BuildContext context) {
   return MaterialApp(
     home: Scaffold(
       appBar: AppBar(
         title: const Text('Api Example'),
       ),
       body: Center(
         child: const Text('Hello World'),
     ),
     ),
   );
 }
}
Furthermore, we must develop an asynchronous function that will fetch the post from the specified url inside the initState Method. To define the asynchronous method, we must use the async keyword. As we are previously aware, asynchronous operations enable our program to finish tasks while waiting for the completion of another task.We can use asynchronous method during fetching data from internet. We can use await keyword inside async function to wait till the post retrieval. We also have to set the state using setState function inside the method as shown in code below:
@override
void initState() {
 super.initState();
 fetchWpPosts();
}

fetchWpPosts() async {
 posts = await fetchPosts();
   setState(() {
   });
}
We must now create the fetchPosts() function. Future can be used to represent an asynchronous function’s output. As we already know, a function that produces a future queues up work to be done and returns an unfinished future when it is called.
We need to use tools known as the http package because we are retrieving value from the internet. Installing the http package requires adding it to the requirements section of the pubspec.yaml file. The latest http package can be found on the pub.dev website. I’m working on this project using http: 0.13.4. We must import the http into the main.dart file as import ‘package:http/http.dart’ as http; We may use the http.get() method, which gives us a Future with a Response in it. The link has to be parsed as well. Finally, we must deliver the result’s body section. Because we must return parsed response.body by using json.decode, which parses the string and returns the resulting Json objects as, if we return the results body, we would encounter an error.
Future<List> fetchPosts() async {
 final res = await http.get(Uri.parse("https://allbachelor.com/wp-json/wp/v2/posts?categories=11"));
   return json.decode(res.body);
 }
If you want to read more about async, await and future, you can view this url → https://dart.dev/codelabs/async-await
Although we have all set up the essential environments to run the code, nothing has been shown on the screen as of yet. So, the only option left is to retrieve the data from the url.
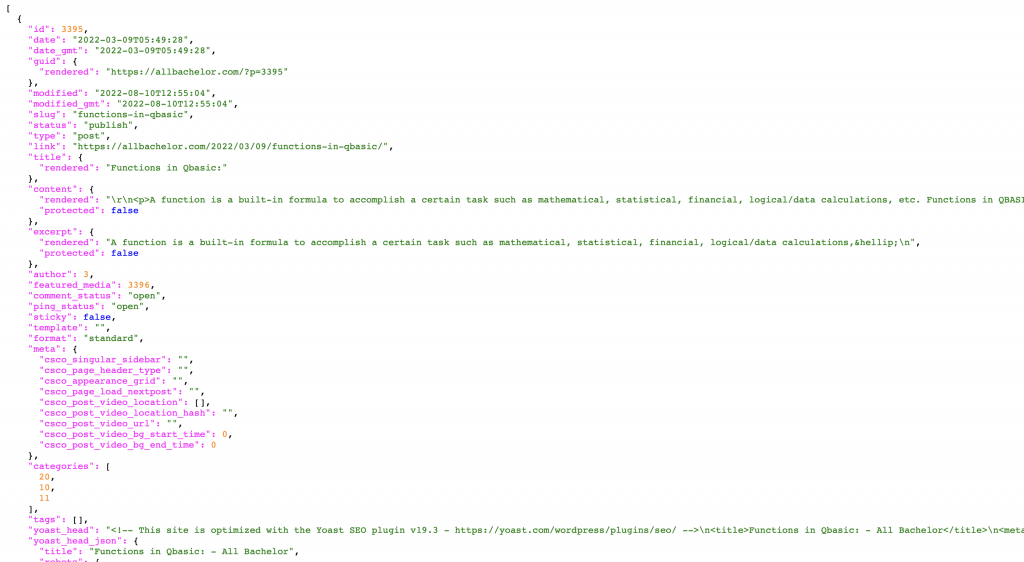
So, in order to do that, we must comprehend the json structure of the API. The JSON format contains attributes like id, date, and status that may be seen by looking at it. Therefore, we can write the code as follows to print the ID:
posts[0]['date'].toString()
posts[0]['id'].toString()
This will retrieve the post from index zero. The.toString() method was created in order to convert date and ID data to String.
Without using the toString() method, you can retrieve String information by:
posts[0]['slug']
Posts[0]['status']
You can add a second big bracket with the attribute name inside it if you wish to display the inner value. Make sure to use single quotation marks.
posts[0]['title']['rendered'],Now this will display the rendered content inside of title content.
If you want to display Image from the network, you can use the code below:
Image.network(
posts[1]['yoast_head_json']['og_image'][0]
['url'],
//     ),
You can get in touch with me if you have any trouble comprehending these codes.
Additionally, you can show post information, the author’s name, the time to read it, the time it was updated, and more. Therefore, your task is to show all of this data in a custom-designed list or column format. You can include extra features like a loading screen, animation, and the display of the default value in the absence of data, among others.
We appreciate you reading this article. If you require this kind of article, please leave a comment below.