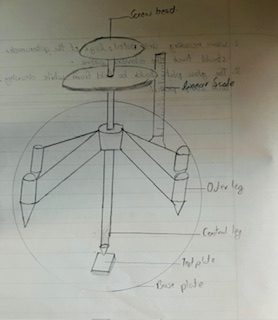
APPARATUS REQUIRED
i) Spherometer
ii) A thin glass plate
iii) A base plate
iv) A graph paper
v) A weighing machine
THEORY
Principle of Spherometer
It works on the principle of screw. It states that the rotation of the circular scale is directly proportional to the linear distance moved by its screw.
Pitch: It is the vertical linear distance moved by the central screw in one complete rotation of the circular scale.
Least Count
It is the smallest value that an instrument can measure accurately. The least count of a spherometer is the distance traveled by the spherometer screw when it is rotated through one circular scale division.
If p is the pitch of the total number of circular dimensions, then least count is given by,
least count = Pitch (p) / vo. of division or circular scale (N)
Volume and density
Let t is the thickness of the glass plate and A is the area. The volume of the glass plate is.
V= AXE
If m is the mass of the plate, then its density is given by, P= M/v
OBSERVATIONS
For least count:
Value of 10 main scale divisions = 10mm
Value of 1 main scale division = 1mm
No of circular scale division (N) = 100.
In complete rotations, the screw advances through 5 main sale divisions
Pitch:
linear distance traveled by the screw in 1 complete rotation
P= msd
= mm
L.C.= P/N = 0.01 mm
Mass of the given plate (m)= 6.01gm
Table= 1 For thickness of the regular thin glass plate
| No. obs | Initial circular scale recording | No. of complete rotation | Final circular scale reading | Additional circular scale | Value of complete rotation | Value of additional C.S recording | total t=(ef)mm | Mean thickness = t mm |
| 1 | 85 | 4 | 97 | 88 | 4 | 0.88 | 4.88 | |
| 2 | 100 | 4 | 3 | 97 | 4 | 0.97 | 4.97 | 4.806 |
| 3 | 0 | 4 | 40 | 60 | 4 | 0.60 | 4.60 | |
| 4 | 90 | 4 | 10 | 80 | 4 | 0.80 | 4.80 | |
| 5 | 95 | 4 | 100 | 95 | 4 | 0.95 | 4.97 |
Glass plate is turning over
| 6 | 85 | 4 | 98 | 87 | 4 | 0.87 | 4.87 | |
| 7 | 96 | 4 | 99 | 97 | 4 | 0.97 | 4.97 | |
| 8 | 89 | 4 | 21 | 68 | 4 | 0.68 | 4.68 | |
| 9 | 10 | 4 | 14 | 96 | 4 | 0.96 | 4.96 | |
| 10 | 33 | 4 | 95 | 38 | 4 | 0.8 | 4.38 |
Table =2 : Calculation of area.
| No. of obs | (x)No. of complete small square | (y)No.of incomplete square | Total (x+y) | Area of glass plate a=(x+y)xvalue of small | Mean area of glass plate (A) |
| a) | 13 | 10 | 23 | 575 | 612.5 |
| b) | 4 | 12 | 26 | 650 |
Calculation
Mear thickness of glass plate (t) = 4.806 mm = 0.48km
Mean area of glass plate (N) = 612.5mm² = 6.125mm²
Volume of glass plate (V) = Axt
= 612.5×0.48 = 2.94cm³
Density of glass plate= m/v = 5.9/2.94 = 2.006g/cm³
Percentage error = (Ps-Pa / Ps )x 100% = 19.76%
RESULT
Experimentally, the thickness, area, volume and density of the given small glass plate is found to be 0.48cm, 6.125cm², 2.94cm³ and 2.006 g/cm ³ by using spherometer and graph papers.
CONCLUSION
The density of a given plate with its thickness and area are determined using a spherometer and graph paper.
PRECAUTIONS
1. When lowering the central screw, the screw road should be rotated in only one direction otherwise back error with occur.
2. When readings are noted, the legs of the spherometer should touch the relevant surface.
3. The glass plate should be held while drawing its cutline with a sharp pencil.

